Sorting allows you to choose the order in which data and items are presented in a visual. This is "in-line" sorting, designed into the visual itself and is separate from any sorting applied to a custom made list of elements.
Owing to the richness of Pyramid's querying capabilities, there are several entry points for accessing sort functionality:
- Quick Sorting - context menu sorting using basic settings and driven by the context of the user's clicks. This is available to all user types.
- Quick Sort Wizard - a simplified dialog to drive more sorting scenarios than 'Quick Sorting', including 'sort-by, then-by' and nested sorting. This is available to Viewers, Analysts and Pros.
- Advanced Sort Panel - a comprehensive dialog and wizard to drive sophisticated sorting scenarios with advanced options. This is available to Pros only.
This topic covers the Advanced Sort Panel where Pro users can create and manage one or more "sorts" with a high level of control over the sorting logic, mechanics and data selections to drive the sort itself. All the various types of sorting tools produce sorting schemes that Pro users can edit or refine in the Advanced Sort Panel.
Quick Sort and the Quick Sort wizards are available from both Discover Pro and Discover Lite. They are also available in presentations at runtime and any embedded discovery or presentation. Note that this includes Discover Lite when opened using Analyze Further. The Advanced Sort Panel is only available in Discover Pro.
In-line Sorting vs Sorting in a List
Users are sometimes confused by these two capabilities and how they interoperate.
- The Advanced Sort panel (and the Quick Sort and Quick Sort wizards) allow the user to sort the results of a query and save those settings into the visual or report definition. This is known as "in-line" sorting.
- Sorts added into Lists are saved into the list definition, independent of its use in a report. When deployed, the list's elements or members will be ordered according to the list's sort.
List sorting is therefore very useful for building highly specific, curated element lists that will be reused over and over, while sorts from a report are more ad-hoc in nature and usually deployed based on the needs of the specific report only. There is a logical overlap in both approaches - and the ability to choose from both strategies offers tremendous scope for designing the smartest analytic reporting to match your business needs.
Both mechanisms can be employed into the same report, each with multiple sorting instances if needed (multiple report sorts, multiple list sorts etc). If the sorts clash, the reporting sort will override the sorts of the lists.
Using the Advanced Sort Panel
Access
Open the Advanced Sort panel by selecting Sort & Filter > Sort from the Home ribbon, Sort from the Query ribbon, by clicking Edit from the context menu of your Sort Info caption, or by right-clicking the background (white space) in your discovery. (Do not confuse this option with opening the Quick Sort or Quick Sort wizard menu options.)


Sort Panel Interface

The logic of Sorting
Sorting logic is broken into three main constructs:
- List: The first is the hierarchy or attribute and the list of elements to sort. This is captured in the "Target" settings below.
- Logic: The second is to choose the sort type. This is captures in the Sort Settings below.
- Values: The last, which is optional, is to describe the values that will drive the sorting operation. This is captured in the selection of related measures, hierarchies and elements that will describe the values for the sort below.
Target
The Targets list is the first section in the Advanced Sort panel. It shows the Chips (hierarchies) or Drop Zones that your report is sorted by. You add your sort targets by clicking the Add options to the top-right of the header (blue plus symbols) and can sort by a single target or multiple target combination. It is important to note that, when you select your target, you are telling Pyramid what your sort applies to and, in the case of chips, how they relate to one another.
Tip: Remove any Targets or Sort Settings (Sort 1 or Sort By, for example) by clicking the X (green arrow below) at its top-right.
Sorting by Drop zone, will keep sorting schemes in place even if a user chooses to Dice, Swap, Add or Remove hierarchies. See below for more.
Sort Chips
Click Add Sort Chips (purple arrow below), to make the member hierarchies within the query the basis of the sort:
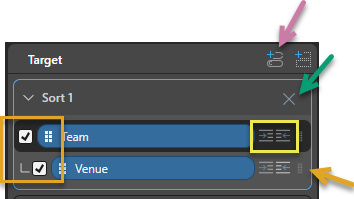
- Use the checkboxes at the start of each row (orange box) to select those hierarchies you want to sort by.
Multiple Chips
You can use the drag handle (orange arrow) to move the targets into the correct order for your sort.
You can also use the indent options (yellow box) to describe precedence between the targets:
- In the preceding example, Venue is indented inside Team. This indicates that the teams list is sorted first and then the venues list is sorted for each team (the second sort is "within" the first). If we had Teams 1, 2, and 3 and two Venues, home and away, we would see one instance of each of the three Teams in sort order and then each Team would have its own pair of Venues in their own sort order.
- If the two chips were positioned at the same level instead (both selected but with no indent), the list would be sorted by team AND venue (as if they were a team-value pair). This means that Team 1 home and Team 1 away could be separate from each other in the list, with other team-venue pairs (Team 2 home, perhaps) between them.
- If there were three chips (or more) you could set up indentation that reflects a more complex nesting pattern. For example, you could indent chips 2 and 3 beneath chip 1 but at the same level as each other; this sorts first on chip 1, then on chips 2 and 3 as if they were a pair within chip 1.
Sort Drop Zones
Click Add Sort Drop Zones (purple arrow below), to use the hierarchies in a particular drop zone as the target of the sort:

- Use the checkboxes at the start of each row (orange box) to sort by all the hierarchies in your selected drop zone.
- When you select a drop zone, you are including all its hierarchies at the same level by default. This is like a non-indented list of chips. The order of the chips reflects their order in the drop zone.
- When you update the hierarchies in the drop zone, you also update the targets that the sort applies to. This ensures that your drop zones and your sorting are kept in sync.
Keeping Sort with Context Functions
When sorting by drop zone, rather than specific hierarchy (or hierarchy combination), changes to the drop zones hierarchical selections will NOT disable or remove the underlying sort. Instead, the new selections in the given drop zone will be sorted according to the pattern. This applies to Dice, Swap, Add and Remove context functions.
Nested Sort
The Nested Sort checkbox in the Sort Settings section is only available where drop zones are selected in the Targets panel:
- Selecting the Nested Sort checkbox treats the chips in the selected Rows drop zone as if they have the indented chip format described above. For example, if your rows contain Teams and Venues chips and you select Rows; first, the Teams are sorted by the criteria and then Venues are sorted only within the teams.
- Clearing (deselecting) the Nested Sort checkbox treats the chips in the selected Rows drop zone as if they are simply selected and have no relationship. This causes the sort to be applied to two chips in the drop zone as if they were a team-venue pair.
Note: You can select Nested Sort for separate target panels; this means you can make chips in Columns nested while chips in Rows are not. This is done by selecting the Advanced Sort panel in Target and selecting / clearing the Nested Sort option in Sort Settings.
Multiple Target Sorts
You can add multiple Target Sorts (Sort 1, Sort 2, and so on) containing either Chips or Drop Zones.
- Where the Sorts conflict; for example, Sort 1 sorts the Manufacturer chip and Sort 2 sorts Rows including the Manufacturer chip; the last sort that you defined is kept and the one it conflicted with is deleted. This happens on Apply.
- Where the Sorts do not conflict, both Sorts are applied separately and two Sort Info captions are added to the canvas.
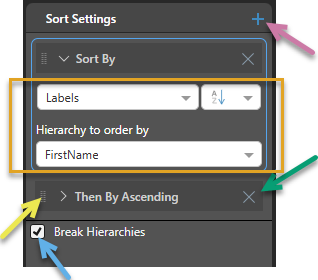
Sort Settings
Sort Settings is the second section in the Advanced Sort panel. It describes the sorting that should be applied to your selected targets:
Note: If your selected target is a drop zone, there may be a Nested Sort checkbox here. Select this checkbox to treat the chips in the drop zone as if they are indented.
Sort by, then by
- With the appropriate Target selected, click Add Sort Settings (purple arrow above) to add a Sort Type section for that target and define a single sort definition.
- If you want to perform a nested sort (that is, you want to sort first by one column, and then, where the values in that column are identical, by another), click Add Sort Settings again. Note that the first Sort Type section has the header "Sort By" and the second "Then By"; this is because the first sort type will be applied and then, where it returns identical entries, those identical entries will be further sorted by some other sort type. (For example, sorting Employees first by Second Name then by First Name.)
- You can change the order of the Sort By, Then By items by dragging the panels up or down using their handles (yellow arrow).
Sort Types
The sort type (orange box above) determines the overall sorting approach to be used. The type options change depending on the hierarchies chosen and the data source type:
- Values: Sorts the hierarchy elements based on numeric values. The numeric values or data points can be specified independently. See below.
- Labels: Sorts the hierarchy elements using their labels or captions. This is effectively an alphabetical sort unrelated to values.
- Custom: Sorts the hierarchy elements in the order they were selected from the elements tree - as opposed to their natural order or logical order. Since this is effectively a "no sort" option, all other sorting options are ignored. See below for more.
- Inverted Hierarchy: Sorts the elements of a multi-level hierarchy such that parent elements appear after child elements.
- Member key: This is a special type that sorts the members into ascending or descending order based on a sequence that is relevant to their type. For example, if you sort dates using their member key, the sort understands that the date list is chronological and so an ascending sort within a year starts at January the first.
Note: Hierarchy elements are always presented in their natural sort order by default. The natural order is usually defined in the underlying data model and is typically alphabetical. Specifying a sort breaks that natural ordering.
Sort Order
Select the direction of the sort:
- Ascending: Sort elements in ascending order from the element with the smallest to the largest data point value, or sort labels alphabetically from A to Z.
- Descending: Sort elements from highest to lowest, or labels in reverse-alphabetical order Z to A.
Break Hierarchies
When sorting across two or more hierarchies, you can decide whether the elements should be evaluated in a nested sequence and sorted in a hierarchical context, or the sort should be agnostic of such structures and sort elements independently - effectively "breaking context."
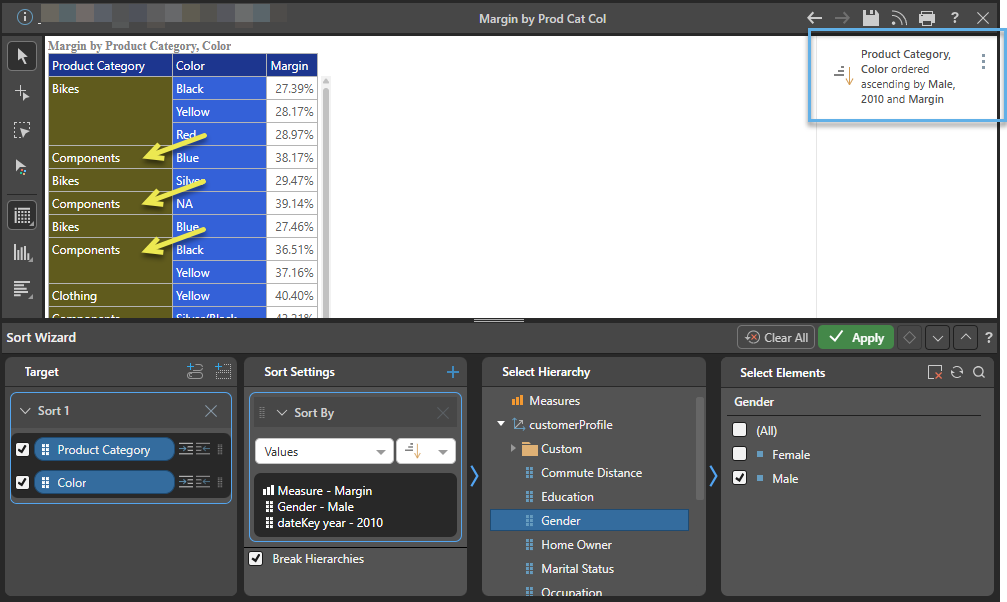
For example, the following simple grid has data shown in its natural order. Its elements are listed alphabetically, first Accessories then Clothing then colors are listed alphabetically from black to Silver:

If I build a sort using both product category and color, and choose to sort with the default measure (with the measure currently used in the query itself, margin), the grid will appear as follows with the Break Hierarchies switched off:

(This says sort category in ascending alphabetical order, then within that, sort color from high to low margin.)
Enabling the Break Hierarchies switch changes the grid to the following, with each item appearing in its numerical position:

Accessories/NA with 658 is the largest item and therefore appears at the bottom of the list. In the scenario, it is not unusual to see elements appear multiple times in the grid (like Accessories).
Break using hierarchical structures
The break option functions in the same manner when using hierarchical structures. For example, the Products hierarchy has Product Category as the top level and Product Subcategory as the next level.
This example contains a sort using the product hierarchy that was expanded down to the next level (subcategory). Margin is the default measure used in the query. The Break Hierarchies switch was switched off. This causes the query to sort by the products hierarchy (Bikes 23.01%, Accessories 38.28%, and Clothing 38.97%) and then within that, sort the subcategory from low to high margin for each subcategory:

In this example, the Break Hierarchies switch was switched on, causing the query to sort by margin without sorting the product subcategory within the product category. This results in the products (bikes, accessories, and clothing) being intermingled in the sub products according to their margin values:

Select Hierarchy & Element
Data Points and Values for Sorting
When sorting elements-based values, we are effectively choosing to sort the elements according to some data point in the data model. Using grids above, we are sorting the category-color combinations based on the margin data point or value for each item.
When you use Quick Sorts, the Quick Sort wizard or this Advanced Sort panel, the data point is heuristically determined from the query itself or the context of the query (filters, and so on). However, you are not limited to using these items. You are completely free to define a different data point to use for the sort order. The data point can be a simple measure selection or be a much deeper selection of elements from anywhere in the data model - regardless of whether it can be seen in the query itself or not.
For example, the preceding grids simply choose margin (the default). The user could, instead, sort the items using "Sales figures for Male customers in 2010" for each category-color combination instead. You can see below that the resulting grid shows a different order with duplicate categories (yellow arrows) and a Sort Info caption (blue):
The flexibility to define an independent data point to drive your sorts is a very powerful option. To pick the items for the data point, we use the hierarchy and element pickers, described below.
Making Data Point Selections for Sorts
By default, sorting is configured according to the measures in the query and anything else driving 'context'. Context means things like slicers and other query functions. To change the metric or data point, optionally select elements from each hierarchy, starting with any other measure.
Once you have selected a hierarchy, then select the specific element or measure from the elements panel.
Note: You can only pick one element from a given hierarchy:
- If you need to pick more than one item, you need to first build a composite or custom member, and then select that from the custom measure / member listing in the elements tree panel.
- You can parameterize the selection using parameterized calculated members or measures.
Custom Sorting
To facilitate the custom ordering of hierarchy elements (or 'members') and measures, you can use the Custom Sort option. This switch tells the query engine to sort elements in the order they were picked when using the element trees, rather than their natural order, another sort mechanism or a specific ordering logic as defined and set inside a Custom List definition. Users can adjust this further using the Set Element Order dialog from the context menu.
Manage Sorts
Sort Info caption
When sorting the query, a Sort Info caption that describes your sort options in natural language shows on the canvas:
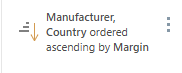
A Sort Info caption is a type of Query Info caption. You can interact with it caption in the following ways:
- To hide the caption, click Hide Query Info from the Design ribbon. Important: Hiding the caption does not remove the Sort action from the query. For more information, see Hide Query Info in Discover.
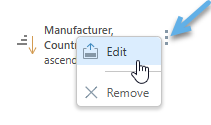
- To open the Advanced Sort panel, click the context menu (blue arrow above) and select Edit. The Advanced Sort panel opens at the bottom of the page.
- To move the Sort Info caption to the top, bottom, or left of the canvas (from its default right-hand position), drag and drop the panel using the context menu icon. When you drag your cursor into one of the docking zones, a blue highlight is shown and you can drop the Sort Info caption into that location.
- To remove the Sort from the query, click the context menu (blue arrow above) and select Remove.
Use the Edit option on the context menu (blue arrow) to open your Sort details in the Advanced Sort panel at the bottom of the page:
Note: Sort Info captions (a type of Query Info caption) can be shown and hidden using the Hide Query Info option in the Design ribbon. You can also interact with them using the options on the context menu and drag and drop.
Sorting Examples
The following examples can provide clearer guidance on how to use the Advanced Sort Panel.
- Basic sort exercise using the Advanced Sort Panel
- Advanced sort exercise using the Advanced Sort Panel